Code-Map Editor
The Code-Map Editor allows you to configure the Code-Map used in generating Morse Code.
You can create new Code-Maps, export Code-Maps to a file, or import an previously created Code-Map files.
Code-Maps are stored in files with a .wcm (WinMorse Code Map) file extension.
When using the Code-Map Editor, you are always editing the current Code-Map, which is not associated with any particular .wcm file.
This means that you are never editing a .wcm file directly.
The Code-Map Editor window is pictured below.

Code-Map Items
In the Code-Map Editor window, there is a list of 'Code-Map Items'.
Each Code-Map Item contains an ASCII character to the left, and it's corresponding dot and dash Morse Code representation to the right.
The periods(.) and minus signs(-) represent dots and dashes.
You may notice the very first line to look a little different than the rest.
That is because the first item is a space (ASCII 32), which must also be mapped.
It is mapped to a '\' which represents a word-space.
Editing Code-Map Items
To edit a Code-Map Item, either double click on it in the list, or select it, then click Edit->Edit Item.
The Edit Code-Map Item dialog will appear.
The Edit Code-Map Item dialog is pictured below.
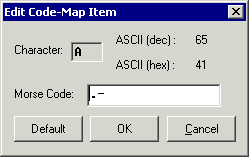
The Character field shows which character is being edited. This field is disabled.
The ASCII (dec) field shows this character's corresponding ASCII value in the decimal number system (base 10). This field is disabled.
The ASCII (hex) filed shows this character's corresponding ASCII value in the hexadecimal number system (base 16). This field is disabled.
The Morse Code field shows the Morse Code that this character is currently mapped to.
This field will only accept dots(.), dashes(-), and backslashes '\'.
Press the Default button to change the Morse Code field to the Morse Code from WinMorse's default Code-Map.
Press the OK button to accept any changes to the Morse Code field.
Press the Cancel button to decline any changes to the Morse Code field.
Adding Code-Map Items
To add a Code-Map Item, click Edit->Add Item.
The Add Code-Map Item dialog will appear.
The Add Code-Map Item dialog is pictured below.
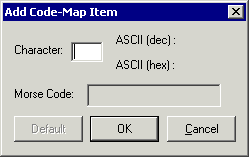
The Character field allows you to type the character that you are adding.
You must type in the character before you may type in the Morse Code.
The other fields and buttons work exactly like they do in Editing Code Map Items.
Note:
- If you add a character that already exists in this Code-Map, then it's Morse Code will be changed to the Morse Code of this operation.
Removing Code-Map Items
To Remove the selected Code-Map Item, click Edit->Remove Item.
You may also press the Delete button on your keyboard to remove the selected item.
Exporting a Code-Map
Exporting a Code-Map will save all of the Code-Map Items to a Code-Map file.
To export a Code-Map click File->Export Code-Map.
Importing a Code-Map
Importing a Code-Map will load all of the Code-Map Items from a Code-Map file.
If you have previously exported a Code-Map and want to import the Code-Map,
click File->Import Code Map.